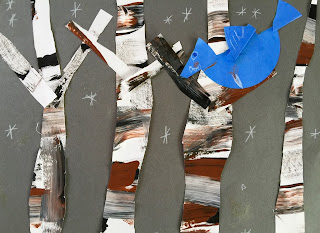
With this winter landscape art project Transitional Kindergarten students explored texture painting for the bark and branches of birch trees. Students practiced scissor cutting, as well as gluing skills. Students created the blue bird out of one circle, cut in half, four and eight parts. Using colored pencils, students added details to their personalized birds.
The Bluebirds are sometimes confused with other blue birds, but they can be distinguished without difficulty. The western bluebird has a blue (male) or gray (female) throat, the eastern bluebird has an orange throat, and the mountain bluebird lacks orange color anywhere on its body. It has a stocky build, and a thin straight beak with a fairly short tail.
Its posture consists of perching upright on wire fences and high branches. The western bluebird pounces on the ground when looking for food, such as worms and berries. It also flies to catch aerial prey, like insects, when available. The western bluebird consumes water from nearby streams and commonly used bird baths.
Kindergarten: Winter Scene inspired by Grandma Moses:
It has been feeling like winter all around our campus, and our Kindergarten students have been working on their Winter Landscape paintings.
Students were introduced to the life and works of the American Folk artist Grandma Moses. Anna Mary Robertson Moses (1860-1961), known by her nickname Grandma Moses. Having begun painting in earnest at age of 78, she is often cited as an example of an individual successfully beginning a career in the arts at an advanced age. Her works have been shown and sold in the United States and abroad and have been marketed on greeting cards and other merchandise.
Students used different kinds of art tools, such as brayers sponges and paint brushes to paint their winter landscapes. Following Grandma Moses’ style combined with basic sketching, drawing and coloring skills, students created their own interpretations of familiar and cherished family traditions that are celebrated during the winter months.
1ST GRADE: Polar Bear Portraits:
To start this lesson we did a read aloud of the book: White Bear, Ice Bear by Janne Ryder. We also researched some polar bear facts, and found out that polar bears have black skin, and a group of polar bears is called a celebration!
Using white chalk on black construction paper students sketched a polar bear portrait. Students used the sides of white chalk to rub a round shape for the head and a body. Two smaller circles made the ears. Students used their fingers to gently blend the chalk to remove any harsh lines that may have been created. Black oil pastels were used to create the facial features and the inner ears. Students rubbed a little bit with the black pastel under the head to create a bit of a shadow. Then they cut our the whole polar bear shape. With a tear and paste technique students created a background with icebergs. The final display turned out to be adorable. A celebration of polar bears!
2ND GRADE: Owl Moon/ Light and Shadow Study
Second grade students read the picture book Owl Moon written by Jane Yolen, illustrated by John Schoenherr. Students were introduced to the basic art concept of light and shadow. Students carefully looked at the illustrations in the book and pointed out shadows. Students noticed that the moon (light source) illuminates the trees (subject) and the trees (subject) cast shadows on the surface of snow. The location of the moon (light source) determines the location and the directions of the shadows.
Students started their Owl Moon study with a light pencil sketch on 140 b watercolor paper. Students were also introduced to the art concept of space. To create a sense of space in their Owl Moon composition, students sketched a horizon line, tree trunks and branches; overlapping and changing in size from large trees in the foreground to smaller trees towards the horizon line (background). Students used masking tape to mask out the areas of the trees. Fine brushes and cool hues of liquid watercolor were applied to color the sky around the full moon and over the trees. Once the sky was dry students carefully removed the masking tape to reveal their trees. Students painted shadows and texture on the trees, and the three-dimensional, spacial, composition came to live. To complete these eye catching, beautiful piece students added a silhouette of an owl.
3rd GRADE: Constellation Illustrations
The constellation of the Great Bear-also known by its Latin name Ursa Major contains an easily recognizable group of seven stars called the Big Dipper. In their science class, third grade students were introduced to the most common constellations seen in the northern sky. During art class students were introduced to the basic artistic background of how artists have illustrated constellations in the past and in the present. Using the ipad app “star walk” students were able to view constellations in the sky in an interactive way.
Students were asked to chose a constellation they felt drawn to and excited about. Using white sketch pencils students carefully mapped out the exact number of stars in their constellations and sketch the mythological figures and creatures around them. For finishing touches gold start stickers were put in place.
Students used high quality prisma-colored pencils to render their fantastic illustrations in a cross-hatching technique. Prisma-colored pencils are soft lead pencils superior for smooth color lay down, blending, and shading. Hatching is an artistic technique used to create tonal or shading effects by drawing closely spaced parallel lines. When lines are placed at an angle to on another, it is called cross-hatching.
4th GRADE: Tree Wire Sculpture:
The fourth grade students were introduced to the basics of sculptures. They learned the difference between abstract and representational sculptures and what the difference is between two-versus three-dimensional art. Students were directed to use 10 strands of aluminum wire to bend and twist a representational sculpture of a tree. Thinner steel wire, aluminum wire, colored twisty wire, beads and buttons were added for volume and color accents. The fourth grade artists created amazing tree sculptures with unique characteristics.
Along with this sculpture unit fourth grade students were introduced to the concept of"Visual Literacy". "How artists can convey meaning, a message, idea." In a class discussion students were responding to two different titles for the same piece of artwork. Students shared great connections and insides about how a title of an art piece can change a viewers perception or opinion. Students practiced critical thinking in developing a fitting title for their tree sculptures. They revised their titles and came up with thought-provoking, clever titles to support their message or meaning of their tree sculptures. Students analyzed a classmate's tree sculpture and predicted and inferred what the message/idea/story might be the artist is communicating.
Along with this sculpture unit fourth grade students were introduced to the concept of"Visual Literacy". "How artists can convey meaning, a message, idea." In a class discussion students were responding to two different titles for the same piece of artwork. Students shared great connections and insides about how a title of an art piece can change a viewers perception or opinion. Students practiced critical thinking in developing a fitting title for their tree sculptures. They revised their titles and came up with thought-provoking, clever titles to support their message or meaning of their tree sculptures. Students analyzed a classmate's tree sculpture and predicted and inferred what the message/idea/story might be the artist is communicating.


