September 2016 art blog
TK/Kindergarten: Discovering Lines
Many people claim they cannot be artists because they "can't draw a straight line". Using the strategies of this unit "Discovering Lines" anybody who can hold a pencil can learn to draw. Drawing is basically a matter of close observation, breaking the subject into lines and shapes, and of course lots of practice.
This unit starts with a teacher/student discussion that anything we wish to draw, simple or complex, can be broken up into the "five line and shape families" (based on "Monart" methodology). Students learned that they can use lines to create a representational or an abstract piece of art.
Students practiced drawing a variety of lines and shapes by copying simple and complex line designs. Students learned that each line or shape starts with a dot. To draw objects and challenging designs students learned to "break-down"their subject into lines and shapes. By using a black felt tip marker (non-erasable), students learned to trust their drawing skills and take risks. Throughout this lesson students practiced visual and verbal line, and shape recognition.
1st GRADE: Design Thinking, Blueprints
This lesson is part of a spiral course of study that builds on what students have learned previously (Discovering Lines), and it is introducing the 21st century thinking "STEAM" (academic disciplines of science, technology, engineering, arts and mathematics) concepts, and skills.
Students were given the task of designing an object, gadget, structure, or house. Starting with a pencil sketch in their art journals, students carefully contemplated their designs. "Who is it for?" "Is it functional?" "Is it comfortable?"
Students experimented and played with the ideas of architecture and design by creating blueprints. Students used recycled cardboard, paper tubes, and cups as printmaking tools. To complete the blueprints students added details, fitting titles and estimated measurements.
2nd GRADE: Abstract Line Art
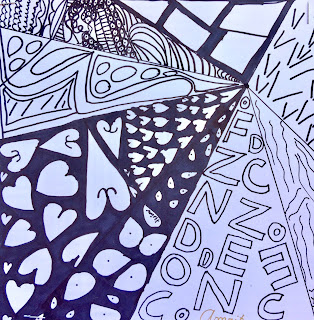
This unit is a continuum of skills and knowledge students acquired during art classes in Kindergarten and First grade. After a discussion on "What is abstract art?" and after reading the book "The Dot" by Peter H. Reynolds, students were directed to create their very own abstract line art piece.
A simple dot was the starting point where students learned how to use a ruler to draw straight lines to divide their picture plane into sections. Each section was filled in, using the “five line and shape families.” Working with black felt tip marking pens, students were challenged to combine different lines and shapes in order to create new, interesting designs. In order to balance black and white areas in their abstract works, students were encouraged to fill in areas or even reverse designs (positive and negative shapes). Throughout the unit students practiced visual arts vocabulary in naming the different lines/shapes verbally, as well as in written form in their art journals.
A simple dot was the starting point where students learned how to use a ruler to draw straight lines to divide their picture plane into sections. Each section was filled in, using the “five line and shape families.” Working with black felt tip marking pens, students were challenged to combine different lines and shapes in order to create new, interesting designs. In order to balance black and white areas in their abstract works, students were encouraged to fill in areas or even reverse designs (positive and negative shapes). Throughout the unit students practiced visual arts vocabulary in naming the different lines/shapes verbally, as well as in written form in their art journals.
3rd and 4th GRADE: Art Journal making
The art of upcycling is to reuse (discarded objects or materials) in such a way as to create a product of a higher quality or value than the original. Third and Fourth grade students upcycled brown paper bags to create art journals. Students were introduced to the basics of bookbinding, the process of physically assembling a book from an ordered stack of recycled paper sheets folded together into sections. Students learned how to sew their journals with the saddle stitch book binding method. To personalize their journals, students decorated front and back cover with washi tape (a high quality masking tape made of rice paper).
To embellish the front cover of their art journals even more, third grade students used a simple stamp printmaking technique. The beautiful patterns printed in black ink onto the brown paper bag journal covers look very elegant and authentic at the same time.
To embellish the front cover of their art journals even more, third grade students used a simple stamp printmaking technique. The beautiful patterns printed in black ink onto the brown paper bag journal covers look very elegant and authentic at the same time.
4th GRADE: Cyanotype
Cyanotype is a photographic printing process that produces a cyan-blue print. Engineers used this process well into the 20th century as a simple and low-cost wat to produce copies of drawings, referred to a blueprints. The process uses two chemicals mixed 1:1, applied to a receptive surface
(such as paper or cloth) and allowed to dry in a dark space (protected from UV light).
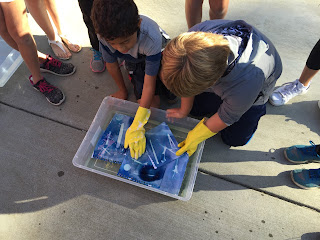
Anna Rochester, fourth grade parent and printmaker, helped coat the paper with the light sensitive mixture, and assisted and directed students in the cyanotype process. Students selected art tools and objects to plan a composition for their prints. Students placed their composition of objects onto their cyanotype papers and exposed them to sunlight. The science integration of this project was for students to experiment with light angle, cast-shadows, and the length of exposure to UV light. After about 10-15 minutes of exposure, students put their prints in a water bath. The water-soluble iron salts were washed away, while the non-water-soluble Purssian blue remained on the paper.
Students adhered their cyanotypes to the cover of their hand-made art journals.


Love all the projects!
ReplyDeleteFantastic working with you this month for the cyanotypes :-)
Thank you Anna, for teaching us about the cyanotype process. Students and I learned lots, and the prints came out fantastic. Thank you for your collaboration.
ReplyDeleteWOW ... you are doing an impressive job teaching our children so many media techniques! You are so valuable beyond words.. you are valuable beyond generations!
ReplyDeleteIt's me Enzo Revelli's mommy.
DeleteThank you for your kind words of appreciation.
DeleteThanks for sharing the process of your projects. We all get to learn through your wonderful teaching! --Donalyn
ReplyDelete